Output-Management
There are various options available for exporting or reading data from REWOO Scope:
- Export datasheet values to a Word document
- Exporting a table view to an Excel document
- Serial or label printing using a table view
- Emailing of templates automatically filled with values
- Download files and documents
- Printing documents and images
- Automatic e-mail dispatch on certain events via EMAIL formula
- Access to data via HTTP REST API
Word Export
In contrast to the PDF export, the export to a Word document allows you to use document templates that are then filled with the current data by REWOO Scope. The advantage here is that you can design the Word file completely yourself and that the required information of the data sheet can be placed freely. For example, you can create your own letters that are automatically filled with the current data from REWOO Scope.
Placeholder
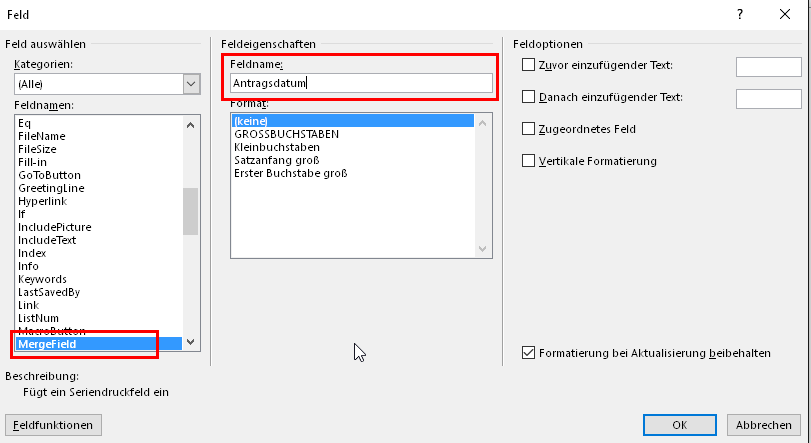
To access fields from the data sheet within the Word file, use the "Quick Parts" option in Word and create fields of type MergeField here. These quick parts can be inserted in the text or also in the header or footer. Fields with the following types are allowed:
Inserting a new quick parts "Field"

Definition of field type MergeField and specification of field name in REWOO Scope
Images
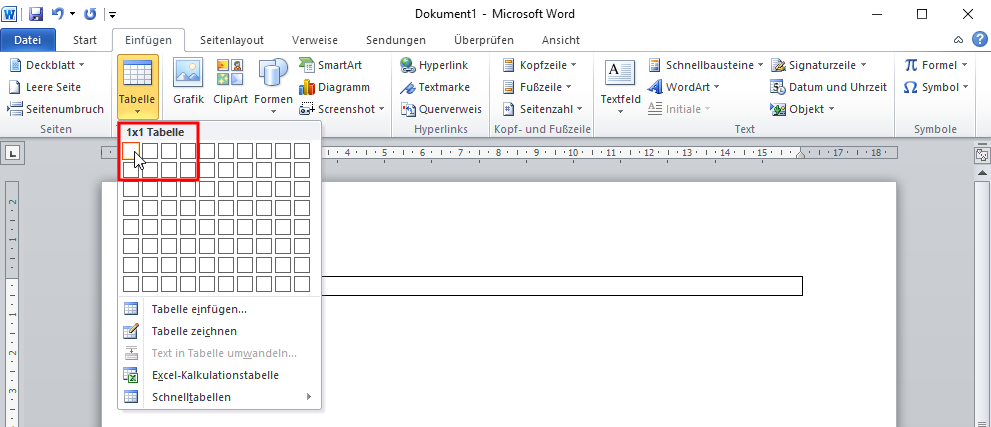
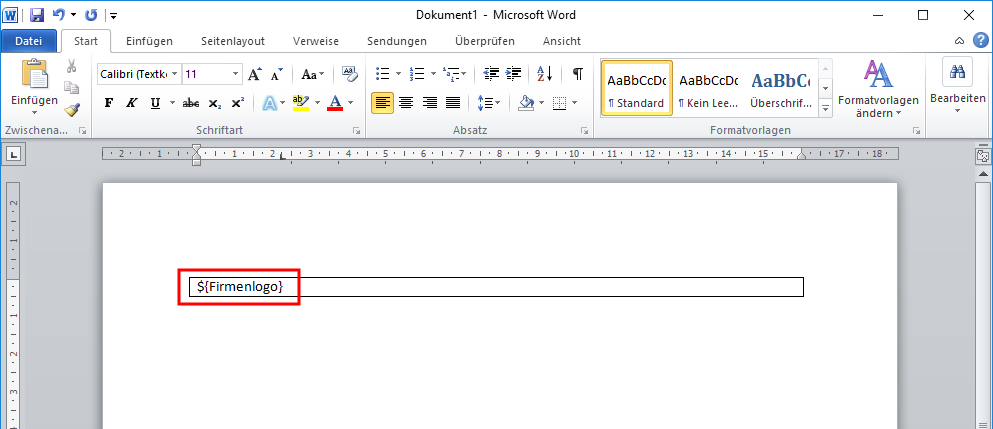
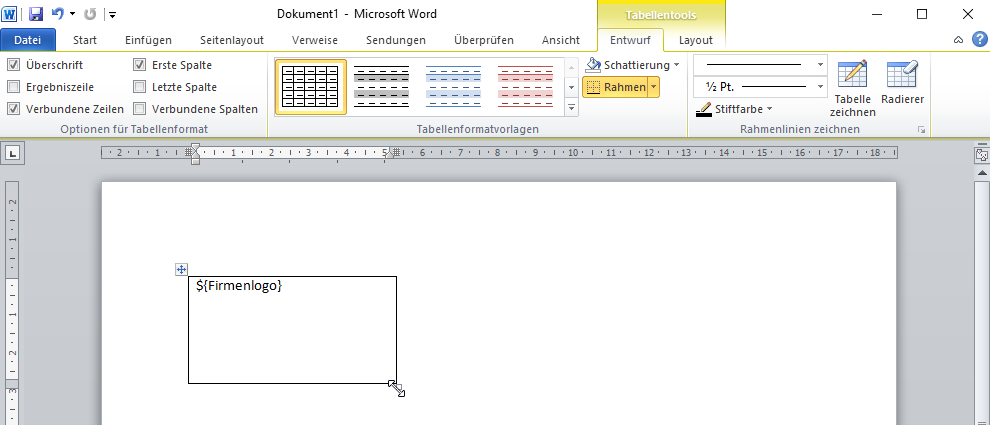
To define a placeholder for images from data sheet fields of type Image, you need a table with one column and one row. The size of this one cell determines the maximum size of the image to be placed. In this cell one writes as placeholder the text ${fieldname}, where fieldname is replaced by the corresponding name of the datasheet field. This table can be placed in the normal page layout or also in the header or footer.
Inserting a 1x1 fields table
Creating a placeholder that refers to a field with the same name in REWOO Scope
Adjust the table to set the size and orientation of the image to be inserted
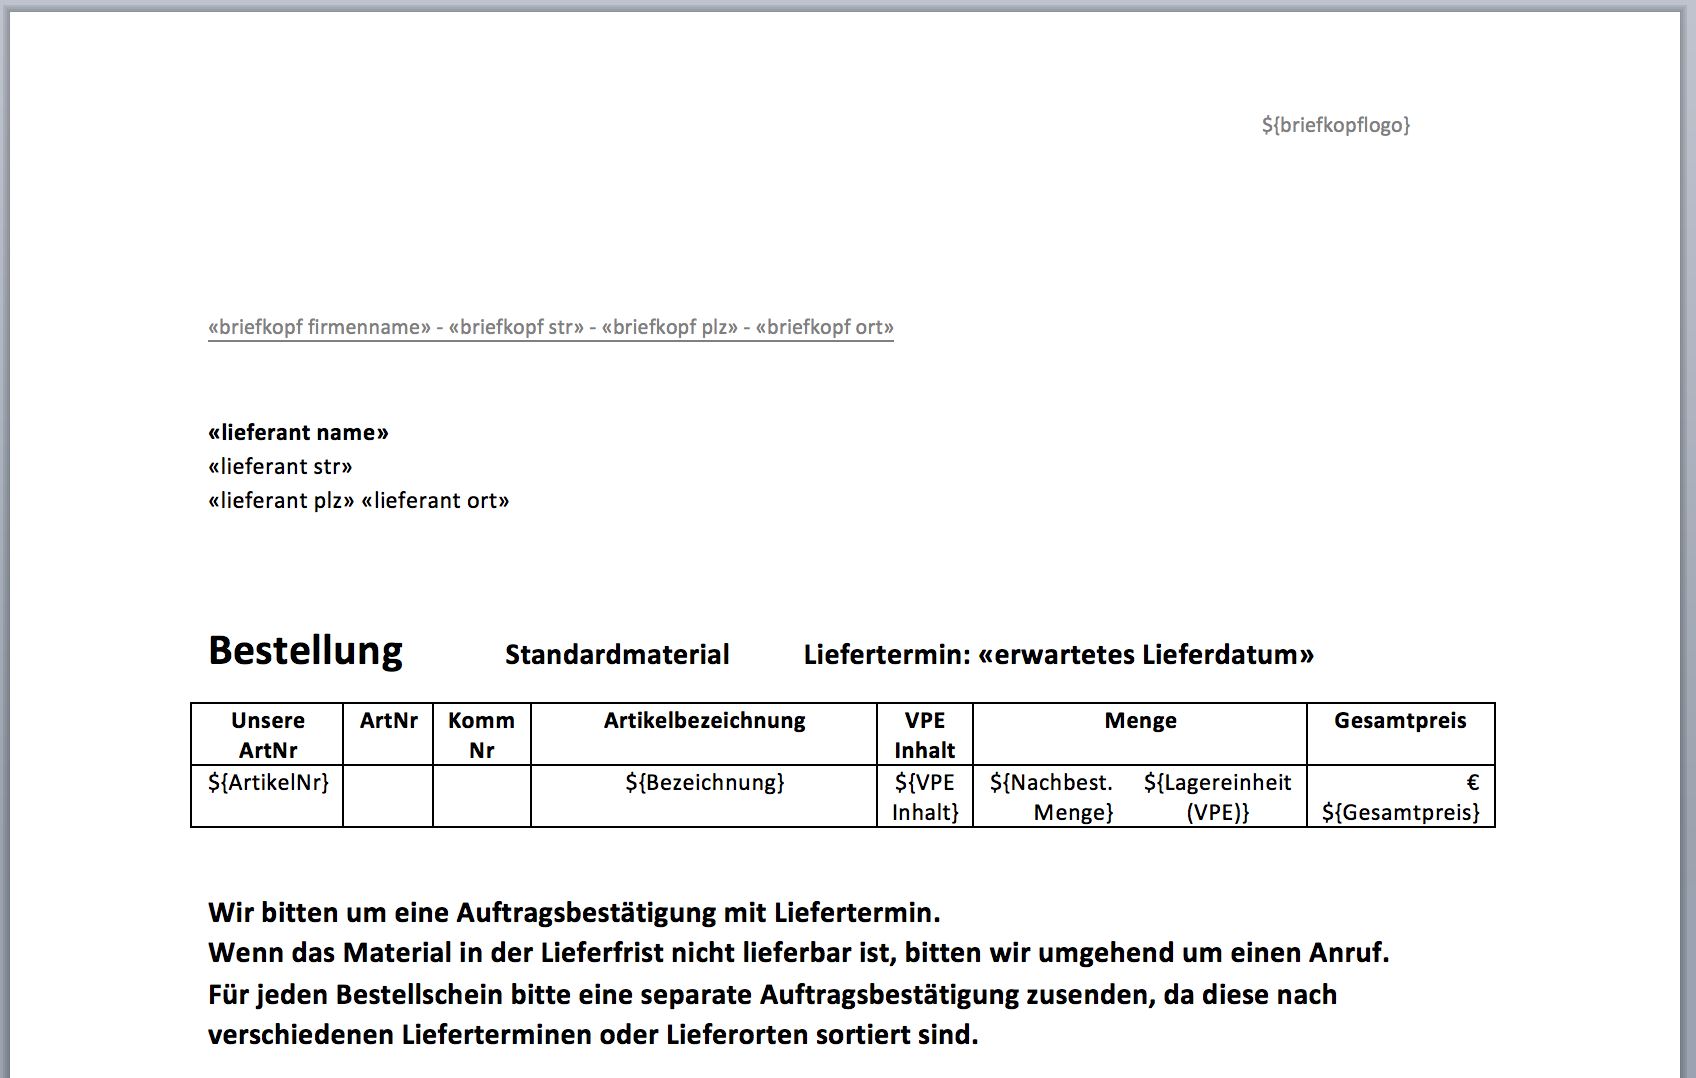
Tables
The values of a table can be transferred to a Word table. Each row with a placeholder is taken as a template and filled with the values from the datasheet. The Word table can additionally contain any number of rows with fixed content.
The placeholders correspond to the placeholders for images: ${column name} references a column with the corresponding name in the table on the datasheet. The number of columns in the two tables does not have to match, nor do all columns have to be referenced from the datasheet.
The amount of rows can be restricted after the placeholder: ${column name}[n:m] exports the rows n to m-1. The row index starts at 0.
MergeField cannot be used here.Inserting a table with placeholders
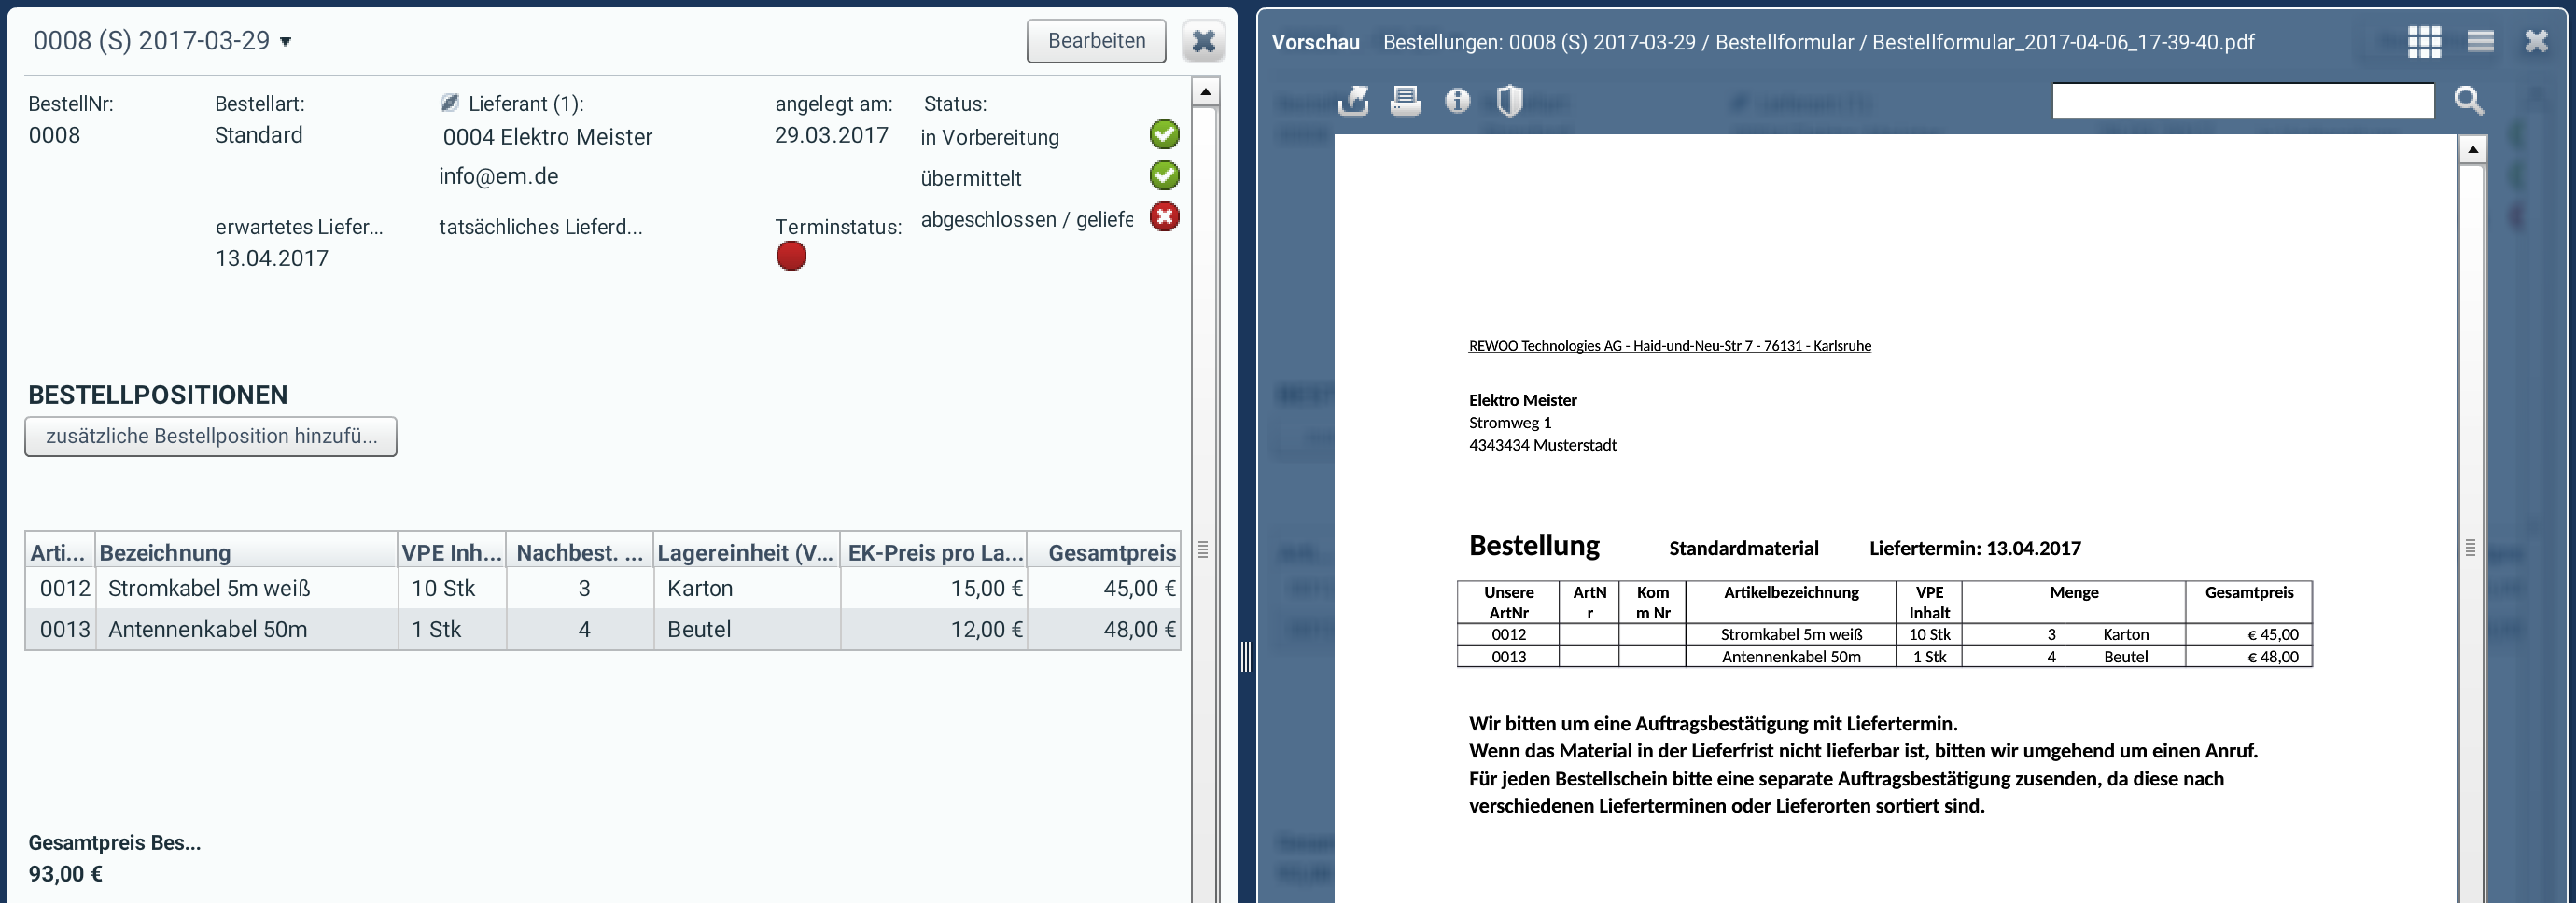
Export of table values
Left the data sheet, right the generated Word file
Use of the template
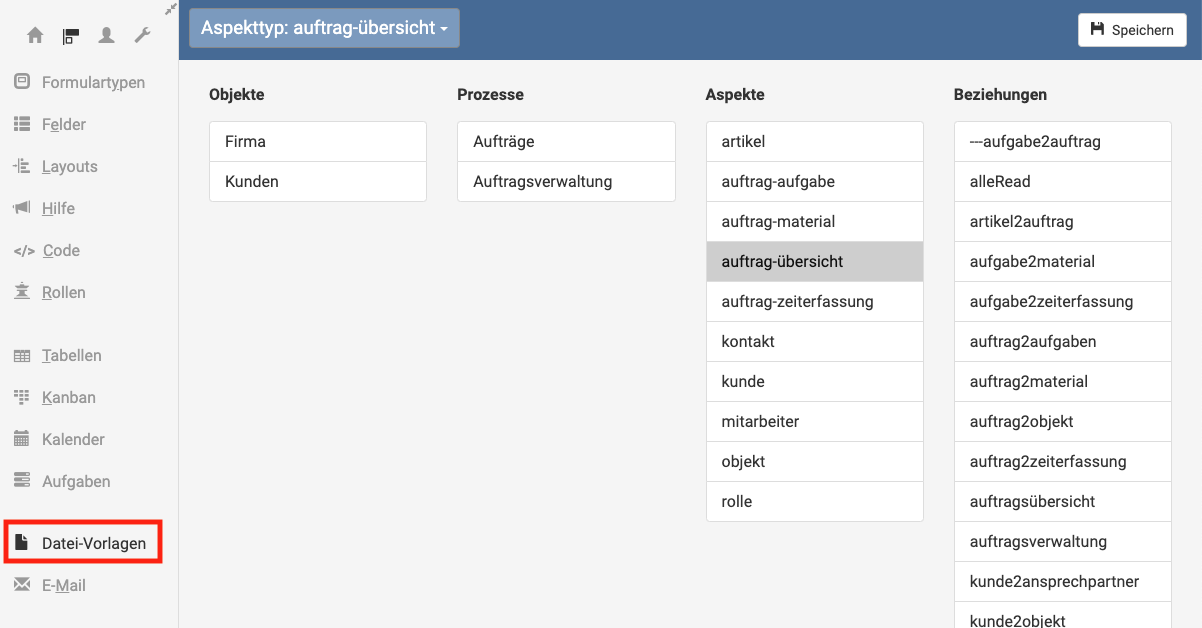
The finished template must now be uploaded to REWOO Scope. To do this, switch to the Designer view and select the appropriate type for which the template is to be stored.
Open type settings
Deposit document
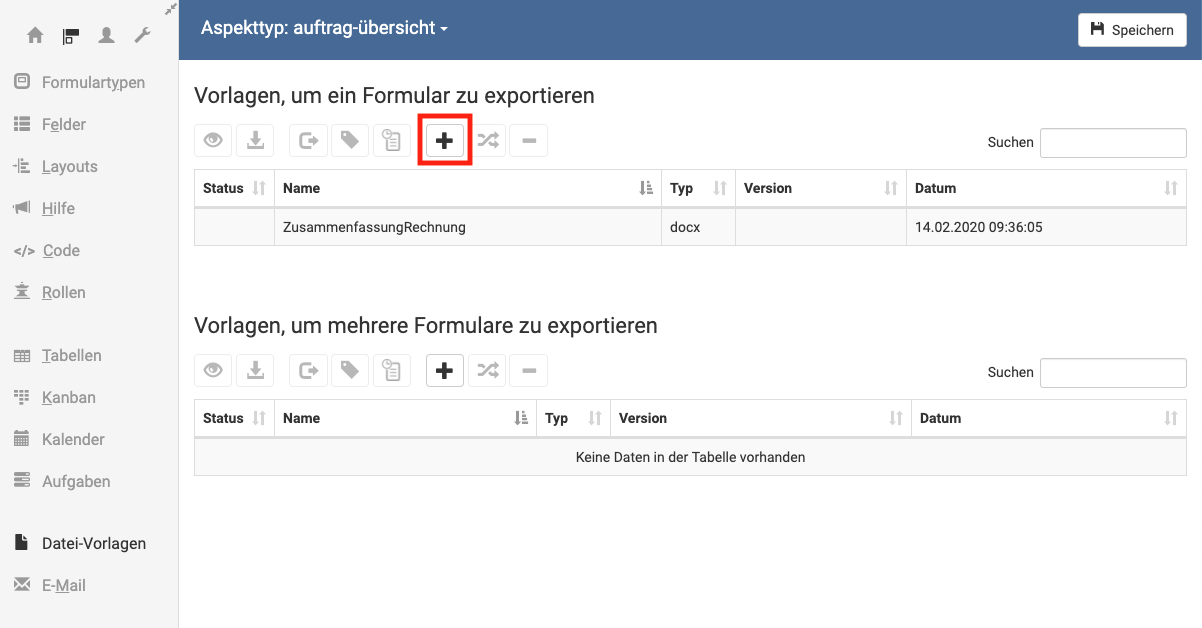
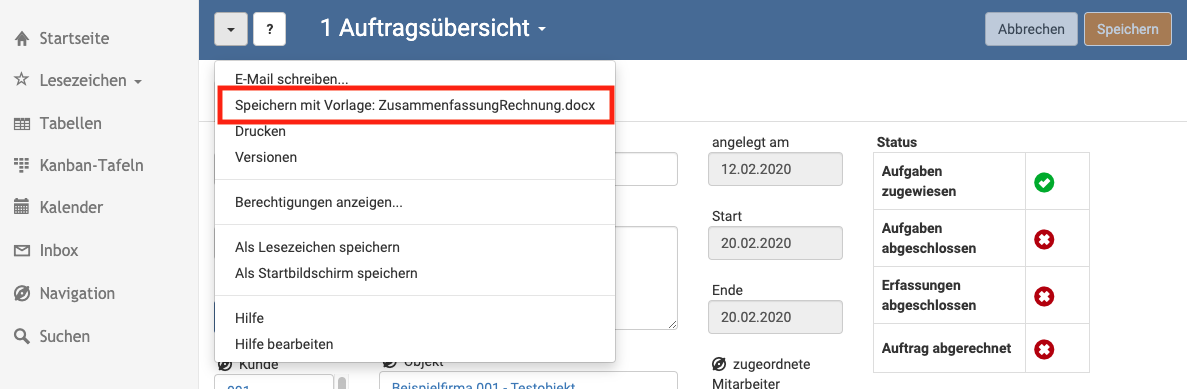
Once the changes have been saved, the export as a Word document is available to the user in the menu of the data sheet.
Export as Word document
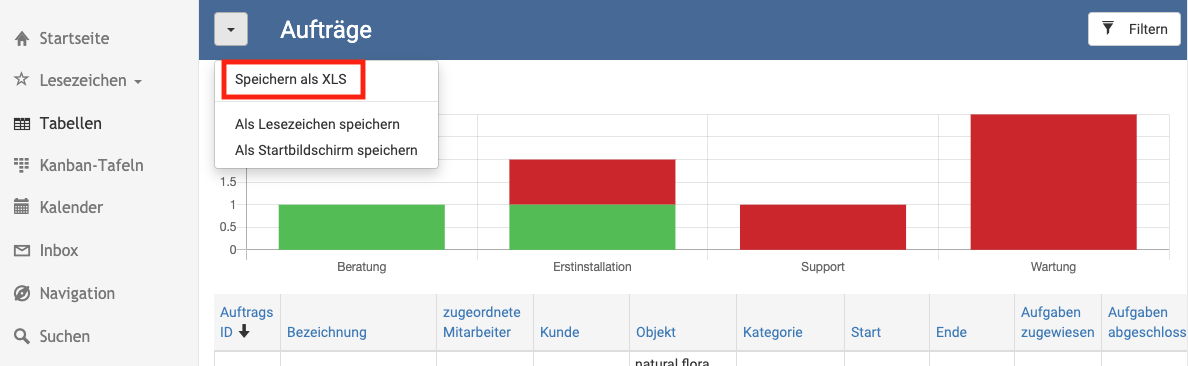
Excel export of table views
The data of a table view can be exported by the user as an Excel file. No further settings are necessary for this. Via the menu on the left above the table, the currently visible data is written to a new Excel file. Set filters and the selected time are observed.
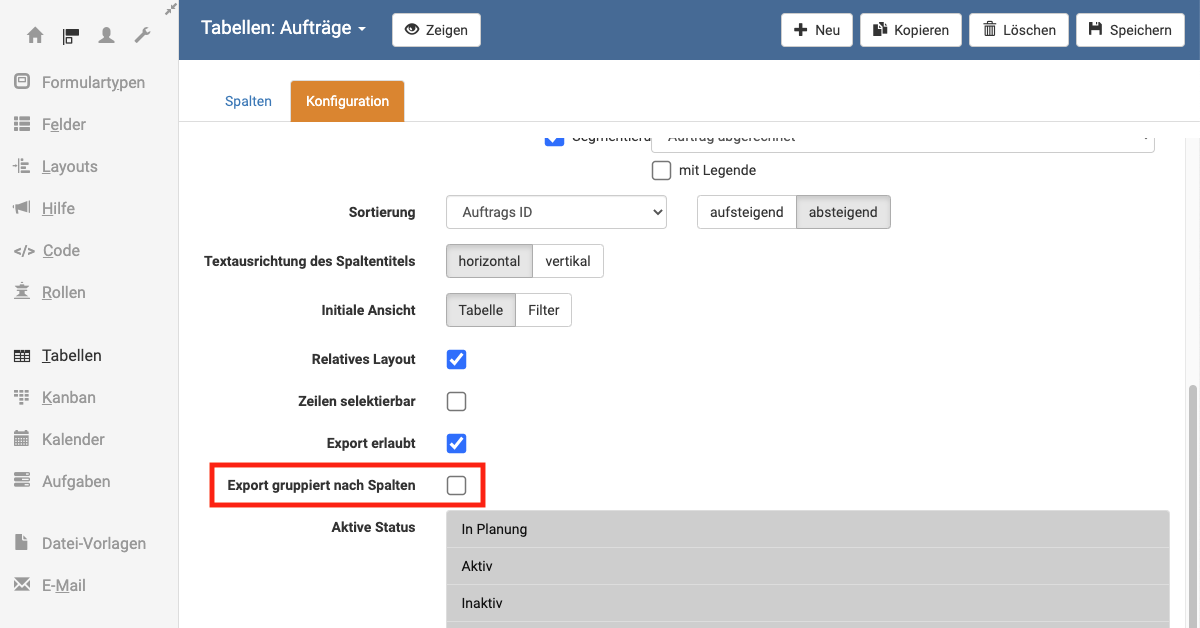
Grouping
For a better overview, a grouping by columns can be activated in the configuration of the table view, so that the data in the output Excel file are grouped according to the values of these columns. In this case, the footer with the set aggregations - sum, maximum, minimum, average, number - is also inserted for each group. So you get intermediate results for each group.
The configuration of the groupings is done in the designer when configuring the table view.
1. Activation of grouping for Excel export
Once grouping is enabled, selection boxes are displayed in the columns table to select the columns for grouping. Grouping is enabled with columns of type String, Number, Date, and Boolean.
2. Column selection

Using an Excel Template
Instead of a relatively generic export, user-defined Excel files can also be stored and used as a template for the export. This offers the following advantages:
- Full control over the design and structure of the generated Excel export
- Export of fields that are not used as columns in the table view
- Exported values can be further evaluated and processed via Excel formulas
- Use of custom cell formats that differ from the format used in the scope
1. Create Excel template
Basically, the template can be designed freely. So fixed text blocks as well as all Excel formulas can be used within the document. For the export of the data, certain placeholders are used within this template, which are replaced with the respective data during the export. In addition, the areas in which the placeholders are to be found must be specified.
An example template looks something like this:

2. Declare template area
Template areas are stored in comments. These comments are no longer present in the final export.
First, an area must be created that specifies which area contains fields that are to be transferred for export (including placeholders). To do this, create a comment for the cell A1 with the following content:
jx:area(lastCell="D7")This spans a range from A1 to D7. The value for lastCell must be adapted to the respective needs of your Excel template. Please note that the Area must contain all cells and placeholders, otherwise they will not appear in the export file.
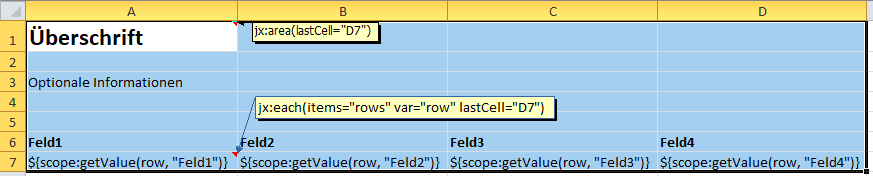
3. Set row range
After that, you need to define a range of rows that will be used as a template for reading the data and that will contain the placeholders for the individual column values. To do this, create a comment for the cell of the first column of this row with the following code:
jx:each(items="rows" var="row" lastCell="D7")This comment configures the current row (here row 7) from the first column to column D as export column. When exporting, this row is used as a template for filling with data for each individual data sheet and copied. A new row is created below it for each data sheet to be exported.
Adjust the lastCell value to your own needs. Note, however, that the cell specified there does not lie outside the last defined Area.

4. Set placeholder
In contrast to the ranges, the placeholders themselves are not written into a comment, but directly into the respective cell. These placeholders must be within a range of lines (line 7 in the example) and must be in the following format:
${scope:getValue(row, "Field name")}Only the field name (inside the quotes) has to be replaced with the respective name of the field or column with whose data the cell (and following rows) should be filled. This field must be present on the datasheet type, but not necessarily used as a column in the table view to be exported here.
Please note: the column headers (in row 6 in the example) are just normal text within the template. They have no relevance for the actual export and could be removed as well as changed to any other text.
=SUM(B7)5. Deposit Excel template
The template in xls format must then be stored in the data sheet type. To do this, switch to the Designer, select the data sheet type of the associated table view for which the template belongs, and switch to the type settings there.
There you store the Excel template under "Templates for multiple data sheets".
6. export using excel template
To export a table view using a template, call up the table view whose data you want to export. In the menu of the table view you will then find a menu item for exporting.
Remedy problems
Values are not in the correct format
Unlike in the Excel export without a template, REWOO Scope does not specify the cell formats itself in the case of a template, but adopts the respective format specified in the template. In the template, adjust the cell format in the placeholders as you want it to appear in the exported file.
Fields missing in export
Make sure that the Area defined in point 2 contains all fields that should also appear in the exported file.
One column is filled with "Unsupported" only
You have referenced a field type that is not supported for Excel export. Currently supported are only:Boolean, Choice, Date, Email, ExternalLinks, Number, RichText and String.
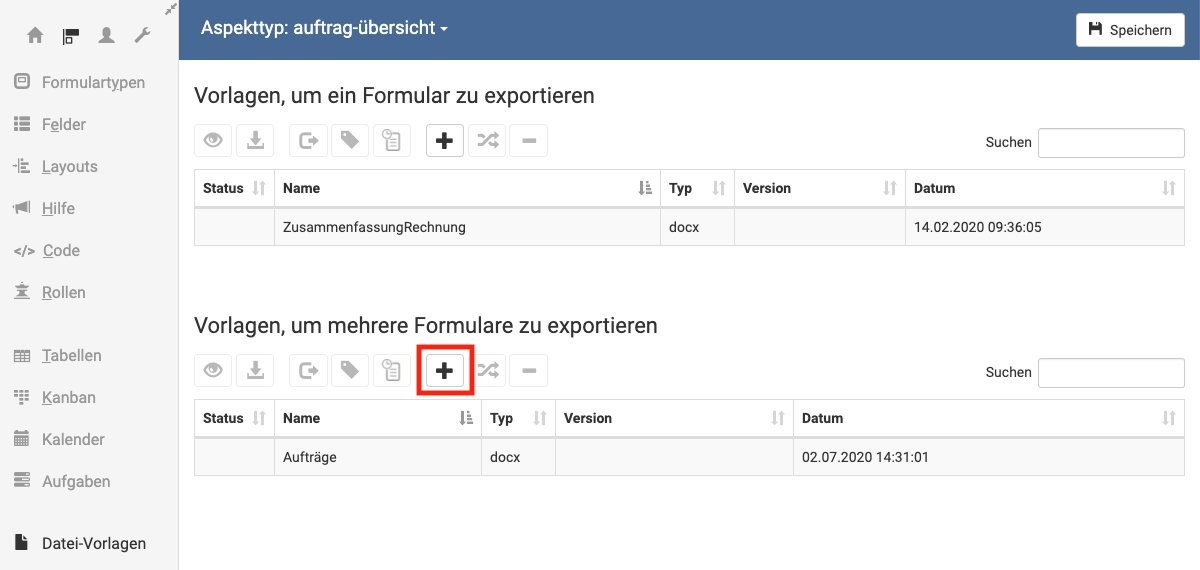
Mail merge via the table view
The table view can also be used for a mail merge. For this, a Word file with MergeFields must be created as a template. How this works is described in the section Word export. In the template, the layout for a record is created. When exporting, all pages of the template are then filled for each record and inserted into the result document.
The finished document must now be saved in REWOO Scope at the appropriate type. To do this, switch to the Designer, select the type for which the template is to be saved, and open the type configuration via the menu.
The document is now saved in the appropriate type in REWOO Scope.
Open type settings
Deposit file
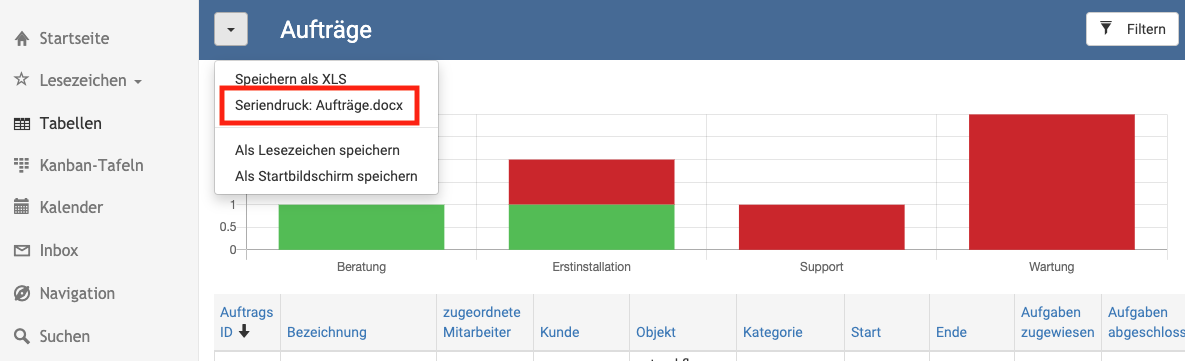
Once the changes have been saved, the mail merge is available to the user from the table view menu.
Mail merge to Word file
Labels
If the layout for several data sets is to be defined in the template, because e. g. several labels are to be printed per page, the MergeFields must be provided with a counter. Thus the identifiers of the MergeFields must be supplemented on the first label with _1, on the second label with _2 and so on. Placeholders for images are ignored during label printing.
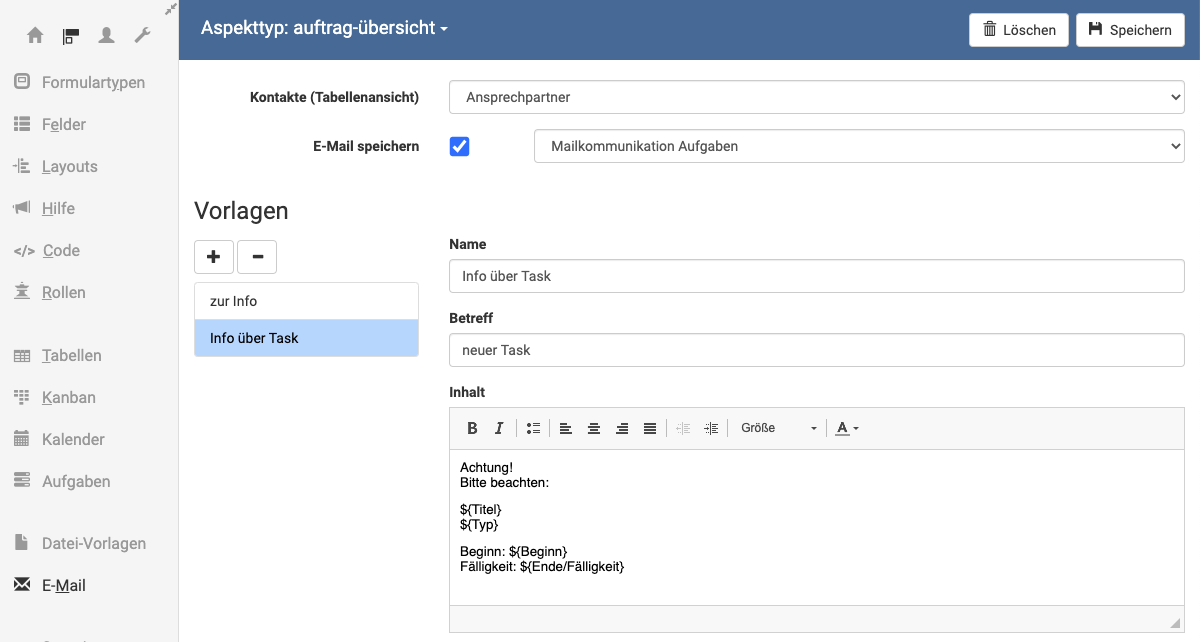
Email Templates
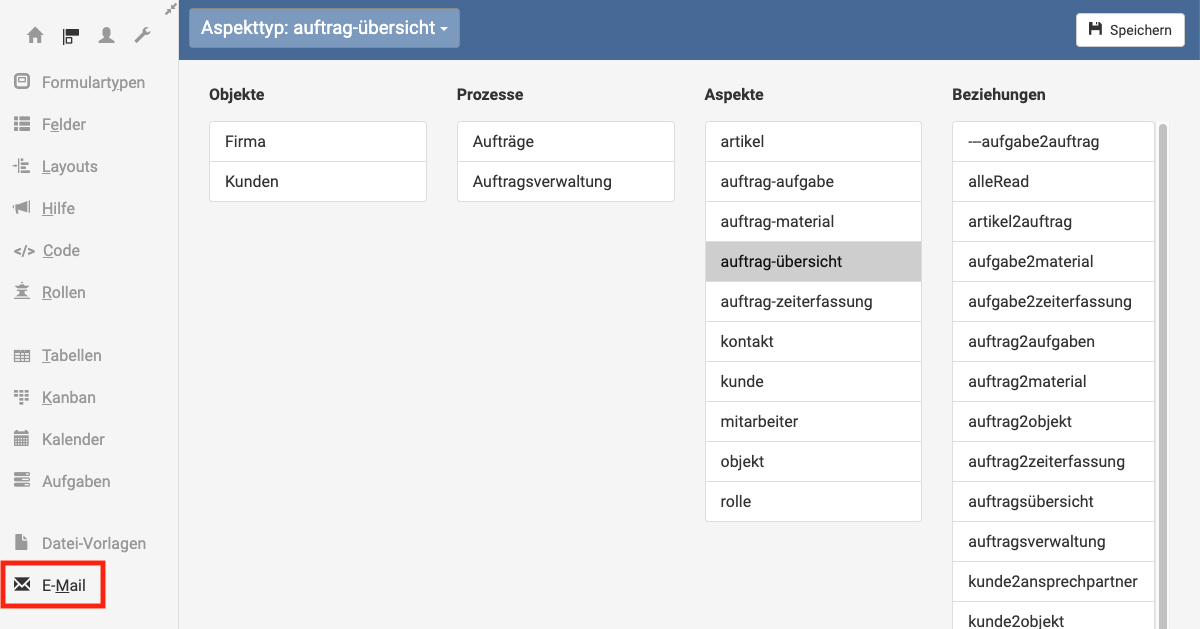
For each type you can create your own e-mail configuration with templates, address book and archiving. One creates this configuration with a mask, which is to be found in the menu of the designer under the point E-Mail.
For the address book you need a table view that contains a column of the type Email. This is entered in the Contacts option. If the archiving of the sent emails is desired, one creates a field of the type EmailFiles, activates the saving and enters this field into the option Email field. In addition, any number of templates can be created. Fields of this type can be referenced in these templates, which will be filled with the current values when the email is created. The placeholder is of the format ${field name}.
Download documents
Files and documents stored/saved in REWOO Scope can be downloaded at any time. This applies not only to the current, but also to all previous versions of a document. The download function is available via a small icon, which becomes visible when you move the mouse pointer over a file name on the data sheet, or directly in the document preview.
It is also possible to download several documents at once as a zip archive. To do this, switch to the document preview and select multiple files in the file list on the right-hand side while holding down the STRG key (CMD on MAC).
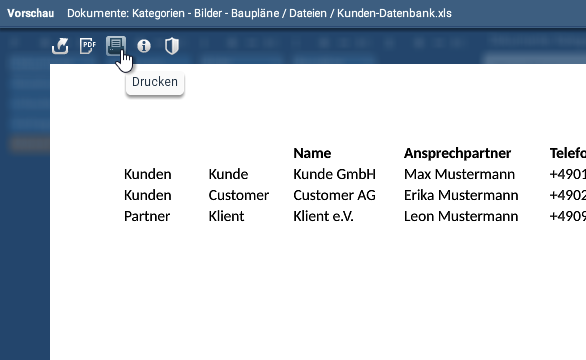
Printing documents
Documents and images stored in REWOO Scope can be printed directly. To do this, open the file in the preview and select the print function in the upper toolbar there.