Import data
REWOO Scope provides you with various options for importing data of different types so that you can subsequently use or process them in REWOO Scope:
- Import of data sets via Excel spreadsheets
- Reading values from cells in Excel spreadsheets via EXCEL formula
- Import of users via LDAP or Active Directory
- Filing of all kinds of documents
- Storage of e-mail traffic
- Upload files and documents via WebDAV
- Data import from previous systems by means of ETL
Import of data sets via Excel spreadsheets
In REWOO Scope, entire data sheets/records can be created or modified using Excel files. This allows you to quickly import a large amount of data, such as the customer directory or employee data. Data can only be imported for one type and for one level of this type. If data sets of multiple types or type levels are to be created, this must be done in separate steps using separate Excel files.Structure of the Excel file
For Excel files to be imported successfully, they must follow a predefined structure, which is described below.
Column 1 contains the names of the data sheets to be created or edited. Row 1 contains the different field names that are to be filled. By the structure cell A1 remains thus empty. In the further cells then the respective values are written, which should have the respective data sheet in the respective field. It may be necessary to adjust the format of the cells so that it fits the format of the data type to be filled.

Import with intermediate layers
This function allows to create forms with multiple levels under parent elements without starting a separate import process for each structure branch. The layer distance from the layer directly below the parent element to the layer of the template must be entered here (in the normal case, i.e. if the template is located on the layer directly below the parent element, the correct value is0).
In the Excel file the table must be extended so that before the column with the element name for each pre-level another column is created and filled with the already existing element names under which the elements are to be created.
In the header of the pre-levels, a strategy can be specified how these levels are found or created. If nothing is specified, the system assumes that the levels exist. Two strategies are possible: COPY(<template>) copies the specified template to create this prelevel, CREATE(<typename>) creates a new element of the specified type. If COPY is used, all further levels are searched for with the COPY strategy in the header within the copied template and not additionally created.
Example of the use of intermediate layers
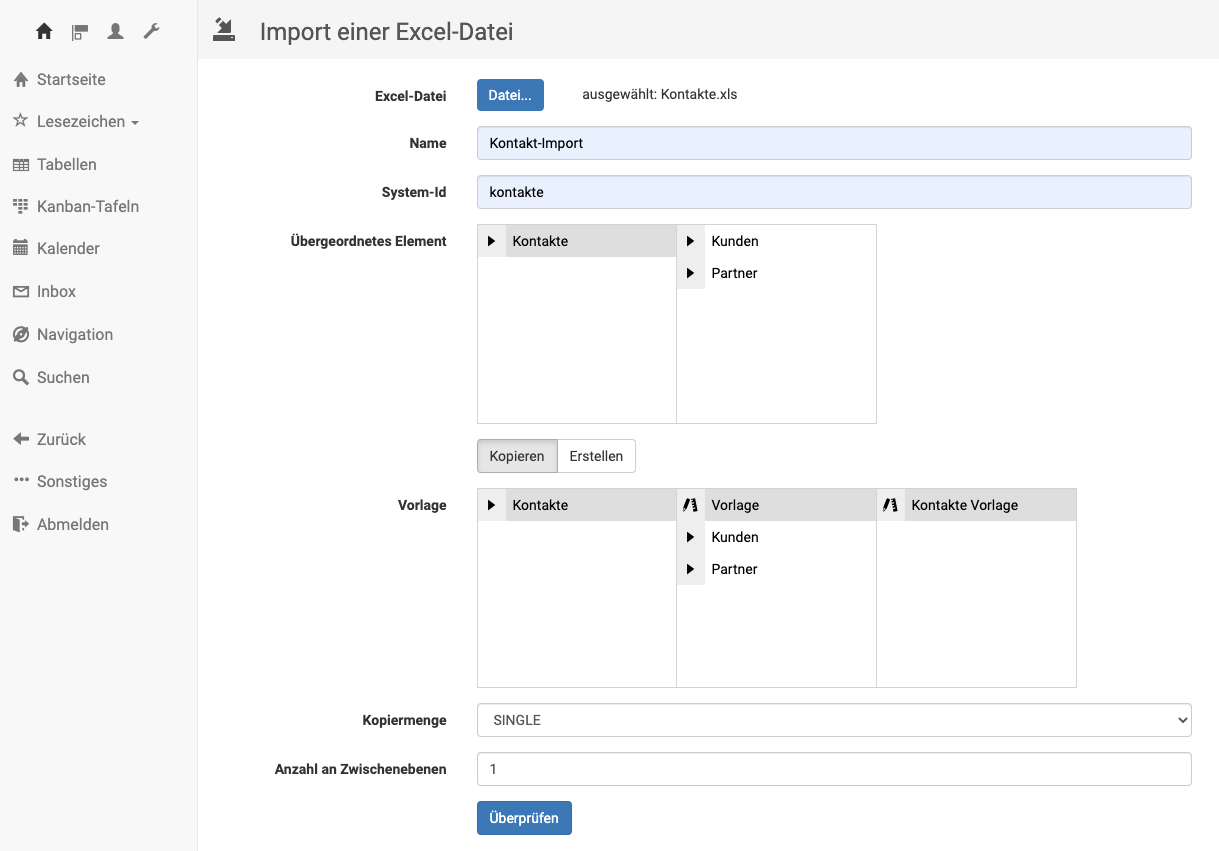
Let's assume that in our REWOO Scope world, a top-level element named Contacts is created, under which there are 2 aspects named Customers and Partners. We now want to import both customers and partners at the same time. Our Excel example would create two elements under the Customer aspect (Customer and Customer), and an Client element under the Partner aspect. Subsequently, these elements are filled with the respective values in Name, Contact, Phone and Address.

In the data import dialog, the top-level element Contacts would be selected as the parent element. The template would be located under the aspect level (where the individual contact sheets are to be created). Since the template is not directly under Contacts, but another level below it, the correct value for the number of intermediate levels is 1. So the data import dialog would have to be filled as follows:
Import with dragging relations for created elements
It is also possible to draw relations to the data sheets created/updated by the data import. For this purpose, one (or more) additional columns must be added to the Excel file. The configuration must be written to the first row of this column (see Syntax). For the respective element of the single row, the name for the element to be connected can be specified in this column.
The following things should be noted:
- The CONNECT column must be added after all values (far right).
- Any number of CONNECT columns can be appended.
- The element to be connected needs a unique name in the world. In the column itself only the name of the datasheet to be connected is given, no reference.
- Any number of CONNECT columns can be appended.
- Pro Zelle kann nur ein Element angegeben werden.
- The element to be connected must already exist before the data import, i.e. it must not be created by the data import itself.
- The element to be connected must not be a TLE.
Syntax (to write in the first row of the column)
CONNECT(ConnectionTypeName,DIRECTION[,RIGHT])- ConnectionTypeName (Name of the connction type to be used for the new connections).
- DIRECTION (Direction in which the connection is to be drawn, as seen from the element specified in this column)
- IN - incoming
- OUT - outgoing
- RIGHT (right that the drawn connection should have; if empty, the default right of the connection type is used)
Example of import with relationships
This example shows the structure of an Excel file, during the import of which relationships are also drawn.
The import creates 5 new orders and sets a value for the order value field for each order. Relationships are then created for the orders, giving the respective clerks write access to the newly created orders (Max Mustermann is given access to orders 1001, 1002, and 1003; Monika Musterfrau is given access to orders 1004 and 1005).
| Order value | CONNECT(sachbearbeiter,OUT,W) | |
| Order 1001 | 1.000 € | Max Mustermann |
| Order 1002 | 2.000 € | Max Mustermann |
| Order 1003 | 3.000 € | Max Mustermann |
| Order 1004 | 4.000 € | Monika Musterfrau |
| Order 1005 | 5.000 € | Monika Musterfrau |
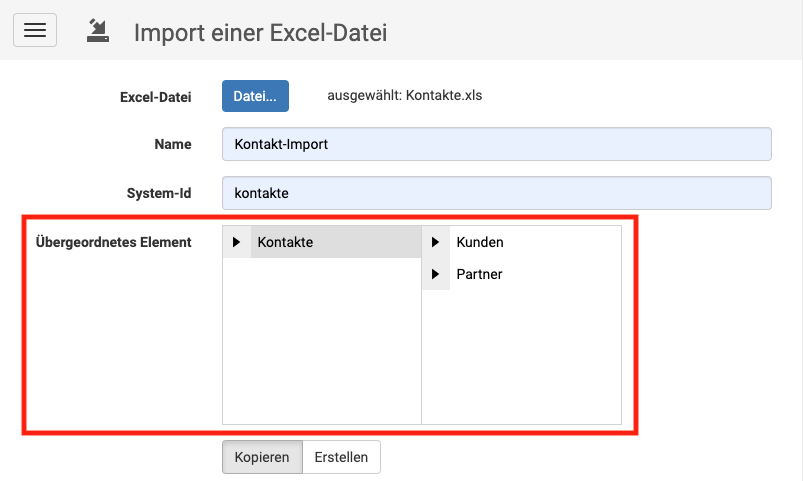
The data import dialog
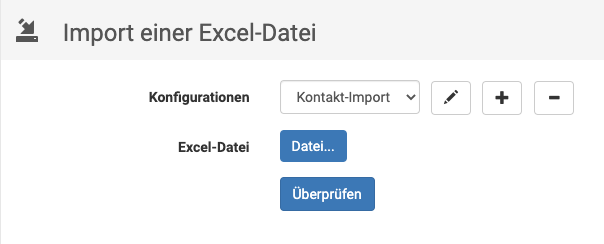
0. Select template
Configurations of past, successful imports are automatically saved and can be selected and reused as templates via a dropdown on each subsequent call. This dropdown also allows editing and deleting individual configurations. Please note that changes to an import configuration are not saved until the next successful import.
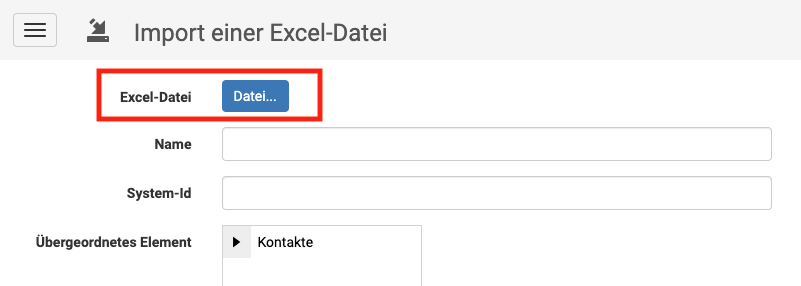
1. Upload Excel file
2. Set name and system id
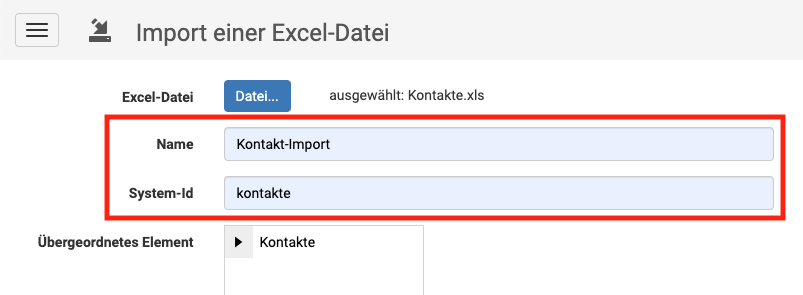
Name - Name of the configuration to be displayed later in the drop-down field of saved import configurations. The name is freely selectable.
System-Id - A string that is used to uniquely assign existing elements and elements to be imported. If elements have already been created via a data import and are to be updated in a later data import, the system ID must be the same in both cases, otherwise all elements in the Excel file will be newly created in REWOO Scope instead of updating those already created.
3. Select parent element
In a second step, the element under which the records are to be created in the Excel file must be selected. If no parent element is selected, top-level elements will be created.
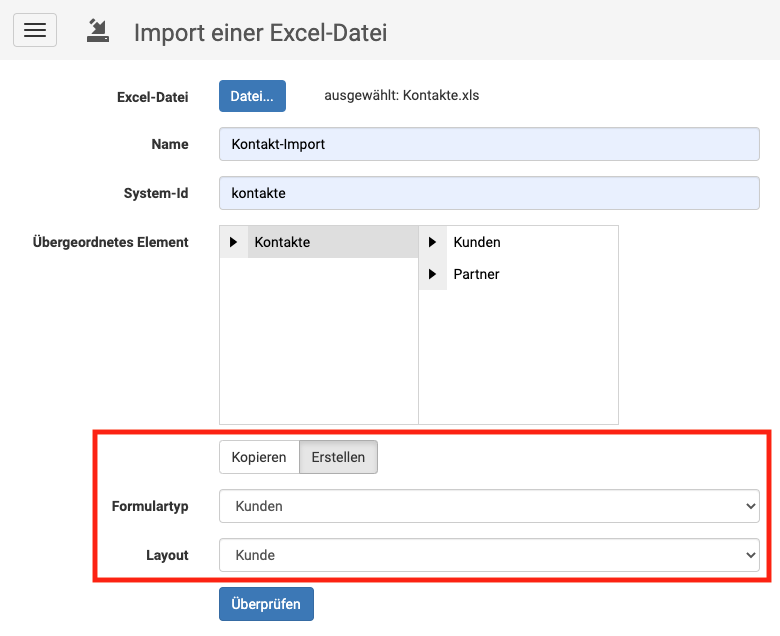
Create vs. copy
"Create" creates a new, empty element of a certain type and fills it with the data from the Excel file and any stored default values of the fields.
"Copy" creates new elements from a template and then fills them with the data from the Excel file, in addition to any values and formulas that are on the template. In addition, a copy strategy can be selected, so that it is possible to create not only individual elements, but entire structures.
4.1 Select form type / layout (only for "Create")
If Create is selected, the data sheet type and layout must be selected in a next step. If top-level elements are created (no parent element selected), the layout selection is omitted. If an aspect or aspect level is selected as a top-level element, the type selection is omitted.
4.2 Select template (only for "Copy")
If Copy is selected, the next step is to select the template that will be used to create the elements.
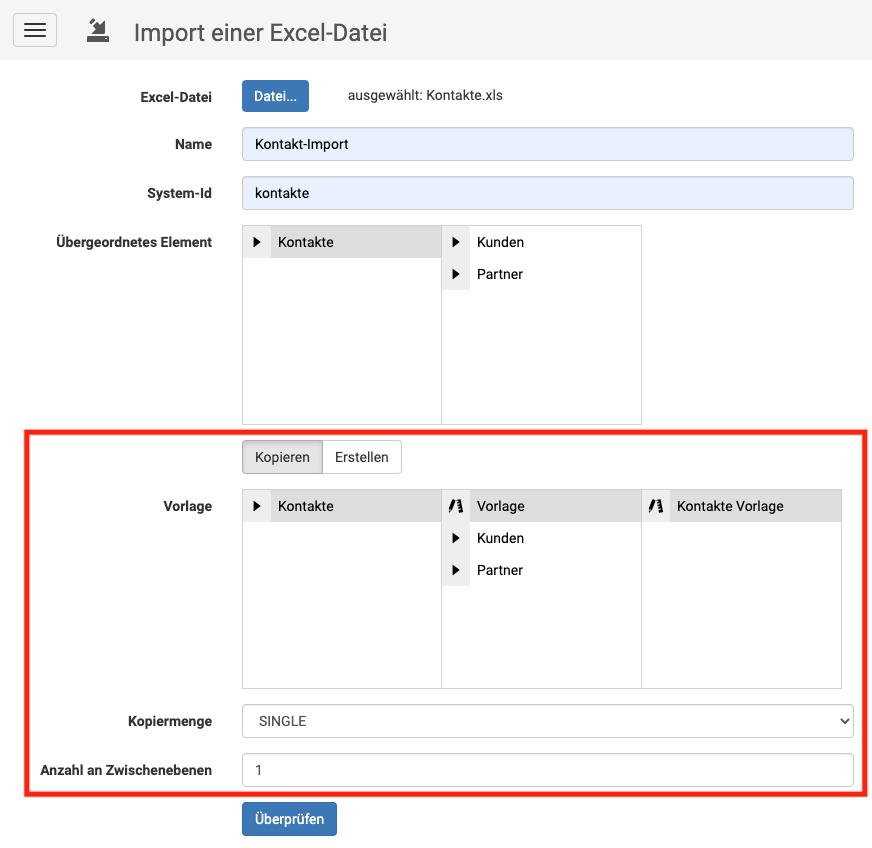
5. define copy strategy (only for "Copy")
This controls whether a single data sheet or a whole structure should be copied. The strategies correspond to the possible strategies of the COPY formula and are explained further in its chapter.
6. set number of intermediate layers (only for "copy")
Number of layers that lies between the parent element and the layers of the template. If the template is on the layer just below the parent element, the correct value here is 0.
7. check and perform import
To avoid major errors, a statistic about expected changes is displayed before the import. This allows to check and estimate beforehand if the operation will lead to the desired result. The import is started only by confirming these statistics.
Creation of accounts via Excel spreadsheets
In the account template management, several accounts can be created at once from one template. When you select a template, a button for importing the file appears in the title bar.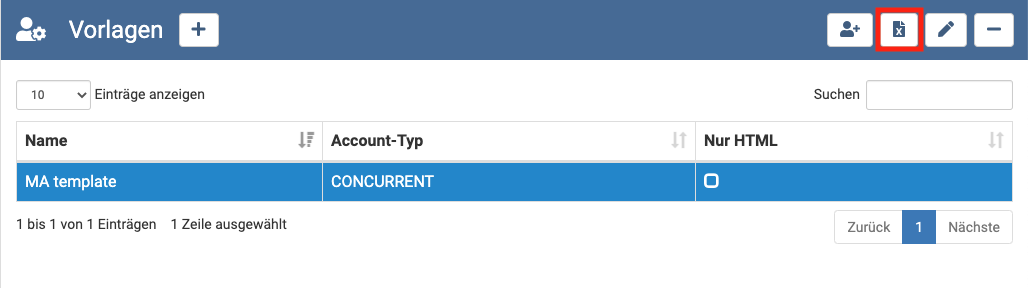 In the next dialog, select the Excel file and the account template.
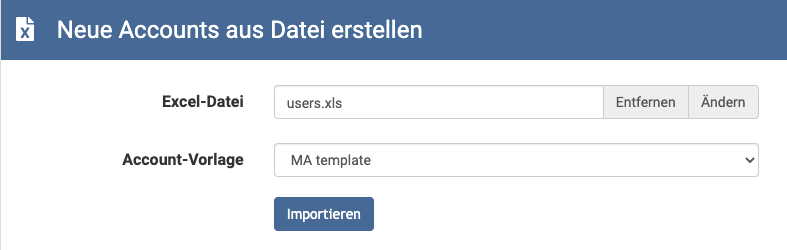 The Excel file should be structured exactly as described above for the data import. The file needs four additional columns with the headings ACCOUNT_USERNAME, ACCOUNT_REALNAME, ACCOUNT_EMAIL and ACCOUNT_PASSWORD.

Filing of all kinds of documents
In REWOO Scope, files of any type can be uploaded, saved, managed and archived in a context-relevant manner. This function is available to every user type as long as the necessary rights have been assigned. Different data fields allow the storage of different file types:
- FileLinks - Container for storing all files
- Image - Container especially for image files
- EmailFiles - Container specifically for emails
- SpreadsheetFile - Container especially for Excel files
Storage of e-mail traffic
EmailFiles fields allow the context-specific filing of emails. Via the file dialog or even easier via drag'n'drop, the relevant emails can be imported from your own mailbox and archived.
Caution: with Microsoft Outlook, a third-party plugin is required for drag'n'drop to work. Contact us if you need technical assistance here.